Setting up MERN Stack on AWS EC2
One of the hardest things I find when starting in a new web language is spinning up a basic server that works. This is difficult because by practice, I typically would stay more towards the front-end of development. Usually when working on a side project, you don’t have a backend person so you are left with one action… figure it out…or paying someone (but that’s not the point).
Shameless plug, check out my Youtube video on this subject and please subscribe to my channel.
But shameless plugs are not the point. In this post, I’m going to explain how to setup an Nginx server with MongoDB, Node.js, Express.js and React.js, otherwise known as a MERN stack. I’m going to do this all on a Ubuntu 16.04 Amazon Web Services (AWS) EC2 instance. This can also be done with other services like Digital Ocean or Linode because they offer Ubuntu 16.04 instances.
I should also mention I’m going to use this MERN boilerplate code. This comes with all the needed packages.
Creating your Instance
Open the AWS dashboard and navigate over to the EC2 service.


On the left side you should see an option called “Instances”. That’s what we are trying to create, a new instance of an AWS EC2 Ubuntu server. Then hit launch instance once on the instances page.

Now it’s time to run through the steps of launching an instance. There are really only 4 things that need to been done.
- Select type of server (Ubuntu 16.04)
- Name the Instance (I don’t do this and this is optional)
- Add a security group for http and https
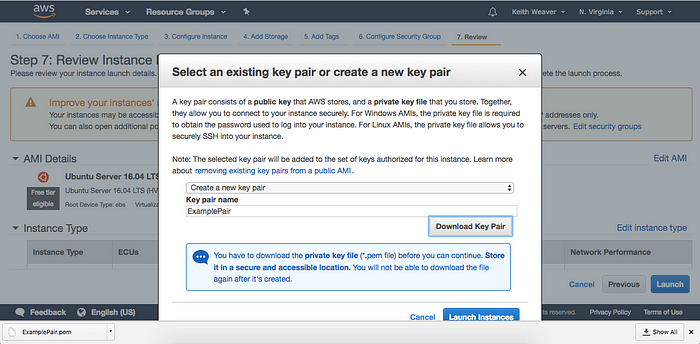
- Create and download a new key pair (You need this to login to the server)
You want to keep hitting “Next”, not “Review and Launch”


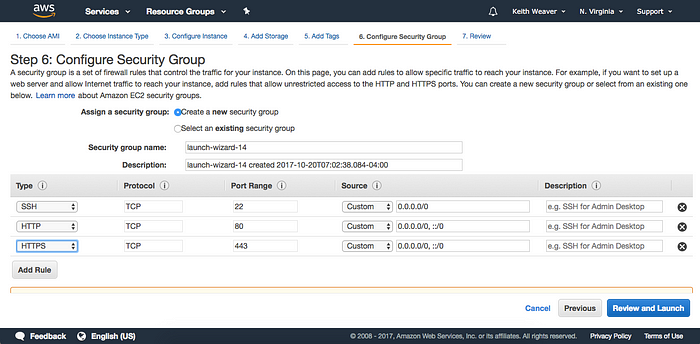
You need to add HTTP and HTTPS rules. Don’t change any of their values.

And voila! Your server is setting itself up.

Connecting & Update
Next we want to actually SSH into your server. If you have a Windows, you’ll probably need an SSH client like Puddy. For this you need to navigate to your page of instances (same spot as the “Launch Instance” button). When you see your instance, single click it and below you should see information about it.

You can see the “Public DNS (IPv4)”, you’ll need it.
Open your terminal, navigate to your key pair file location. My was in my downloads, which I don’t recommend. I personally often delete my downloads. Once there run:
chmod 400 ./YOUR_KEY_PAIR_NAME.pem
Next you will use that Public DNS IPv4 link with this command:
ssh -i "YOUR_KEY_PAIR_NAME.pem" ubuntu@YOUR_IPv4_LINKWhen you connect for the first time, it will ask you a question. Type “yes”.

Now it’s time to update the server and it being a Linux box, we will use apt-get. Run:
sudo apt-get update && sudo apt-get upgrade -yYou may get this window. I just pressed up then enter to select the first option.

And done! Server is all updated. Time to start installing things.
Nginx Setup
We are going to start with the Nginx. You will need to run:
sudo apt-get install nginx -yOnce that is complete, you can check the status of your Nginx with:
sudo systemctl status nginx
Just press Crtl + C to close this. You may need to start Nginx with:
sudo systemctl start nginxThen run this so Nginx starts on startup:
sudo systemctl enable nginx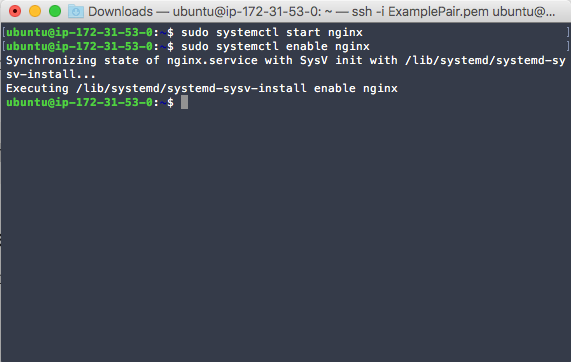
Node.js Setup
Now it’s time to install Node.js, we are going to install it with NVM. Start with an update:
sudo apt-get updateInstall the following packages with:
sudo apt-get install build-essential libssl-devYou may be prompted with questions which you response with Y . Once complete we are going to download the NVM install script:
cd ~
# Change 0.33.5 <---- You see this the version may have changed check the nvm page
curl -sL https://raw.githubusercontent.com/creationix/nvm/v0.33.5/install.sh -o install_nvm.sh
bash install_nvm.sh
source ~/.profile
nvm install 6.0.0
nvm use 6.0.0
node -v
# Outputs a number: "v6.0.0"
npm -v
# outputs a number "3.8.6"
And with these commands you should have Node.js installed.


Adding Your Domain
You don’t absolutely need a domain but in order to get a SSL you’ll need one. This is a matter of configuring the Nginx. You’ll run to remove the original default configuration file with:
sudo rm /etc/nginx/sites-available/defaultThen you’ll need to replace it with your own information. We are going to use Nano, you can use any editor. To save and quit Nano, you press Ctl X then it will ask if you want to save or do Ctrl + O then Ctrl + X.
sudo nano /etc/nginx/sites-available/defaultPaste the following and replace your_domain.comwith your own domain.
server {
    listen 80;
    server_name your_domain.com www.your_domain.com;
    location / {
        proxy_pass http://127.0.0.1:8080;
        proxy_http_version 1.1;
        proxy_set_header Upgrade $http_upgrade;
        proxy_set_header Connection 'upgrade';
        proxy_set_header Host $host;
        proxy_cache_bypass $http_upgrade;
        proxy_redirect off;
     }
}
This will have all HTTP web traffic redirected to port 8080. Our application from the boilerplate code is pointed at 8080.
The example domain I’m going to use is opentrafficapi.com (don’t ask why I have it). On your domain provider side, you’ll have to point the DNS to your EC2 public IP. I use GoDaddy for my domains and I’ll navigate to this domain’s DNS. Under my EC2 instance info (where we found the IPv4) there is Public IP IPv4, we need to copy it. Mind is 54.165.201.168 and I copy it to my DNS:

The last step is reloading Nginx to accept our new configurations.
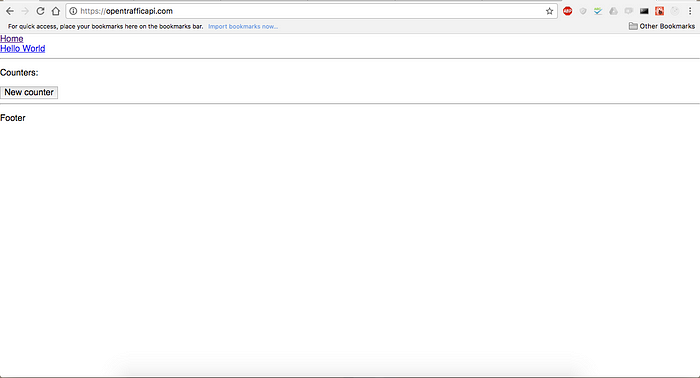
sudo systemctl reload nginxAfter a few minutes, if you navigate to your domain or IP. You should see the something with Nginx.

MongoDB Setup
We are next going to setup MongoDB. If you take a look at the boilerplate code, I put MongoDB on port 12017. In the dev environment, I don’t use a user for authentication but in production I need to.
Run the following to install MongoDB:
sudo apt-get install mongodb -yThen we will have to reload the packages, start mongo, and verify it’s status.
sudo apt-get update -y
sudo service mongodb start
sudo service mongodb status
Again, Ctrl + C to quit the status thing. Now we want to add a authentication user then turn on auth. Don’t do it the other way around because you can’t log into Mongo to add a user.
use my_db_name
db.createUser({ user: "exampleUser",
                 pwd: "changeThisInfo",
                 roles: [{ role: "readAnyDatabase", db: "admin" },
                          "readWrite"] })
db.auth("exampleUser","changeThisInfo");
exit
If you don’t get 1 as a response for db.auth then your user isn’t working. Please also change the user and pwd values. The last step is turning on authentication for all users:
sudo nano /etc/mongodb.confUncomment auth=true

And boom another thing setup!
Git Setup

Nginx done, MongoDB done, now it’s time to stop getting the 502 and get some code on the server. As mentioned many times, I’m using this code. You need to fork a version of this onto your own Github. The reason for forking it, and not just using my copy is because you need to add SSH keys and only the owner can add them under settings. Could I not use Git? I mean you don’ t have to but you are making life hard on yourself because all aspects of the remote branch will be on the server so you always can tell what version/change the server is at.
We have to generate a unique key so Github knows it’s a valid “user” pulling and we don’t want to log into our Github account every time we pull. So we are going to generate a SSH key. When prompted, just press enter.
cd ~/.ssh
ssh-keygen
# Generating public/private rsa key pair.
# Enter file in which to save the key (/home/ubuntu/.ssh/id_rsa):
# Enter passphrase (empty for no passphrase):
# Enter same passphrase again:
# Your identification has been saved in /home/ubuntu/.ssh/id_rsa.
# Your public key has been saved in /home/ubuntu/.ssh/id_rsa.pub.
# The key fingerprint is:
# SHA256:A_UNIQUE_THING_FOR_YOUR_SERVER ubuntu@ip-123-123-123
# The key's randomart image is:
# +---[RSA 2048]----+
# |       random    |
# |      stuff      |
# |       that      |
# |   .   looks   . |
# |      cool       |
# |     but         |
# |       does      |
# |      nothing    |
# |     really      |
# +----[SHA256]-----+
Now if you run
cat id_rsa.pubIt will output something and you copy that to Github.

When I say copy to Github, go to your repo, settings, deploy keys, add deploy key. Then add your key with a name and hit create.


On your server, change to the root directory then clone YOUR copy of the repo (My username should not be in the link). You should also be using the SSH clone link:
cd ~/
git clone REPO_PATH_WITH_SSH
You should have a copy of your repo on the server now. Again if you don’t, probably something wrong with the repo link or ssh key generation. You shouldn’t have to enter a Github username and password.
Keep it running
I say “Keep it running” but it was never started so we will start it first. We need to install packages for the web application. We will run:
cd ./REPO_NAME
npm install
Once everything is install, we will start the dev environment with:
npm run start:devTake a look at the package.json file if you want to know where I’m getting these commands from.

Yes, this should have happened. Two things:
- If you are working on a private repo (has “Private” tag next to repo name on Github). Add
config.jsfile in theconfigfolder then push to Github. - If it’s public, don’t do setup 1 or everyone can access your database. You’ll need to do this on the server. Run:
mv config/config.example.js config/config.js. This will create aconfig.jsfile.
In the config.js file, you need to setup your database credentials created and tested above. So your db variable should read:
db: 'mongodb://exampleUser:changeThisInfo@localhost:27017/my_db_name',
db_dev: 'mongodb://exampleUser:changeThisInfo@localhost:27017/my_db_name'
If you are doing option 2, run nano config/config.js and change it. You should have changed your username and password for this and probably your database name. But they must match above.
Now try again:
npm run start:dev
Check your domain/IP address. You should see:

But once you hit Crtl + C, your web application will stop. This doesn’t work as an option because we need it always running. We will use pm2 to keep it running. Install with:
npm install pm2 -gIf it does not work, try with sudo . Now to start the production you can run:
pm2 start server.js -- --production
Now you can change db_dev to be different. Personally, I don’t use the username and password for dev on my localhost. With pm2 you can do a few things, show or stop . To show information about this process, run:
pm2 show serverYou can stop the server with:
pm2 stop serverAnd restart it the same way, you started it the first way. Great server is up!
SSL Setup
Now if you don’t have a domain. You are sadly done. SSL’s need a domain to verify against. But if you have one, continue on.
SSL is the last step. I followed this tutorial and listed it below. Change the example.com to your domain.
cd ~
sudo add-apt-repository ppa:certbot/certbot
# This is the PPA for packages prepared by Debian Let's Encrypt Team and backported for Ubuntu(s).
# More info: https://launchpad.net/~certbot/+archive/ubuntu/certbot
# Press [ENTER] to continue or ctrl-c to cancel adding itsudo apt-get update
sudo apt-get install python-certbot-nginx
# Ysudo ufw status
# Status: inactivesudo ufw allow 'Nginx Full'
# Make sure the domain is pointing to the server at this point.sudo certbot --nginx -d example.com -d www.example.com
# Enter email
# A to agree
# Share email so Y/N
# Fails if no domain
# otherwise 1 or 2 for redirect of traffic
# I recommend 2

Lastly, we need to point the domain on port 443 to 8080 and add an additional pem .
sudo openssl dhparam -out /etc/ssl/certs/dhparam.pem 2048
Edit the configuration:
sudo nano /etc/nginx/sites-available/defaultThe certbot added:
listen 443 ssl; # managed by Certbot
ssl_certificate /etc/letsencrypt/live/easyapi.io/fullchain.pem; # managed by Ce$
ssl_certificate_key /etc/letsencrypt/live/easyapi.io/privkey.pem; # managed by $
include /etc/letsencrypt/options-ssl-nginx.conf; # managed by Certbot
Add below the certbot added part:
ssl_dhparam /etc/ssl/certs/dhparam.pem;Check the syntax of the configuration:
sudo nginx -tReload the configuration:
sudo systemctl reload nginxLastly, setup the auto update. We will use crontab :
sudo crontab -e
# Select an editor (I'm using 2)
Add this line:
15 3 * * * /usr/bin/certbot renew --quietChange to your repo and start your production.
cd ~/YOUR_REPO
pm2 start server.js -- --production
Conclusion
You should be all setup on a production MERN environment with an SSL and MongoDB setup. If you have questions, please leave a comment below.